
The Nerves system is a toolchain for building firmware. It produces a stripped down linux volume that directly launches the applications of your choice into a BEAM virtual machine. The concurrrency, availability and efficiency of the BEAM make it a great choice for use in embedded systems. In this post I'll walk through the steps needed to get a full Nerves project up and running.
Prep
Nerves supports a wide range of hardware boards, but I'll use the RPi Zero W in this case. It has built-in wifi, USB, supports gadget mode and is well supported hardware-wise. This makes it a great board to get started with.
I'm doing my development under MacOS High Sierra and all of the appplicable software is up to date (Erlang 20.1, Elixir 1.5.2, Docker 17.11.0). The following steps did work on machine at the time of this writing. In some cases there may be times when things go astray, either some unexpected output or, worse yet, a build error. I have provided a list of debugging links below that one may find useful in those cases. The completed project is also available on Github.
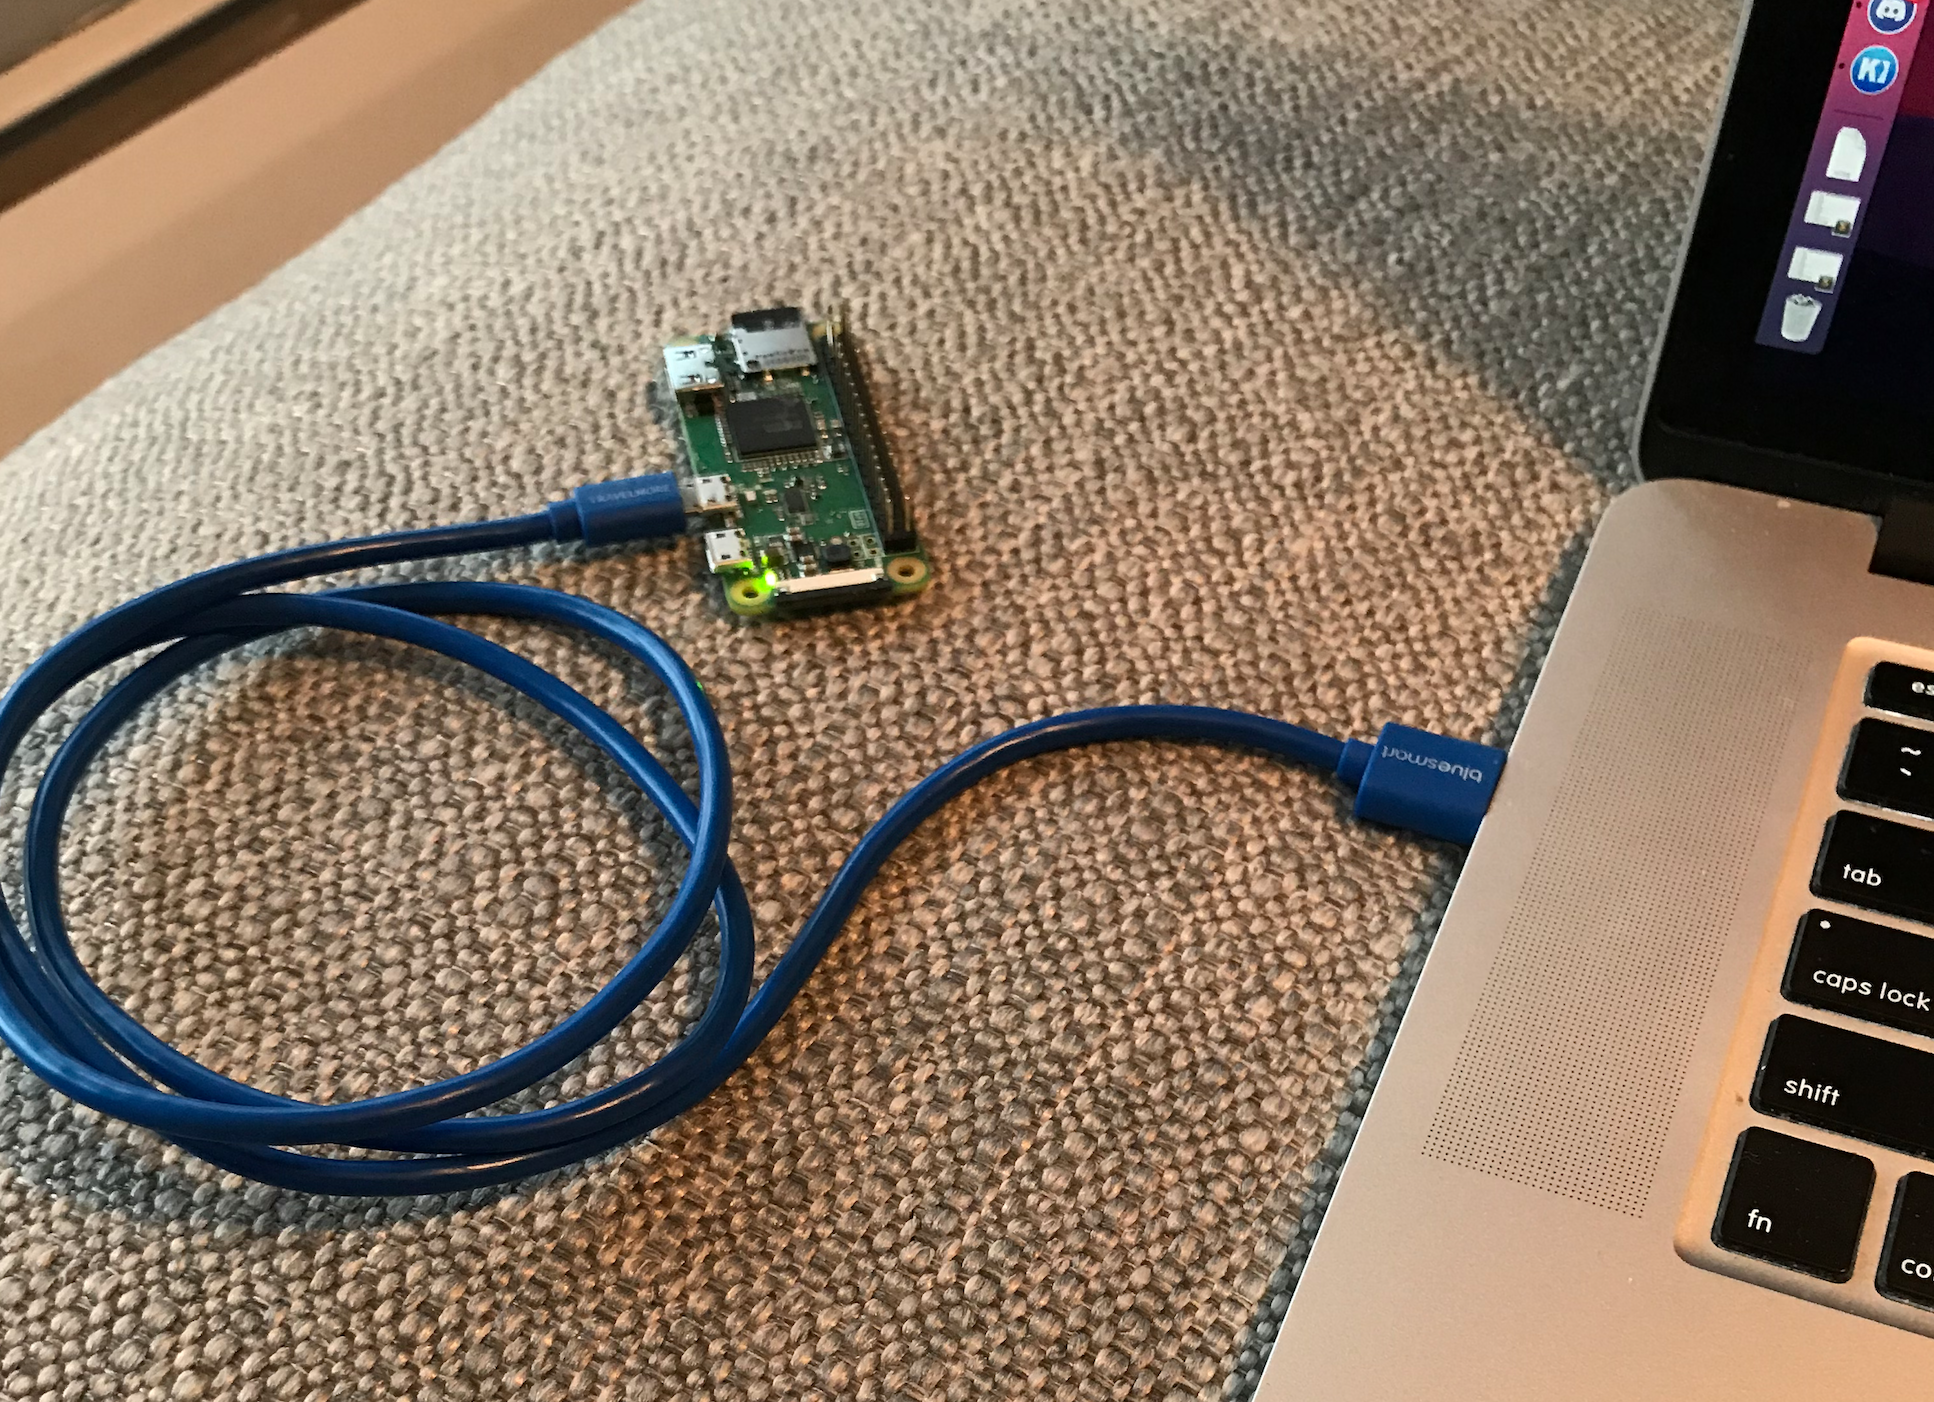
Once you are up and running there will be times when you need to know what's going on inside the RPI. In this case engage gadget mode by having the RPI0 plugged in to your laptop's USB port as shown below. Then open a new terminal window and enter the following: screen /dev/tty.usbmodem* 115200. Here you can see all log entries as well as interact with the BEAM through an iex shell.
Creating the project
We will begin by creating a poncho style application, the merits of which are discussed here. In short it means we place the phoenix app and the firmware app side by side, and make the phoenix app a dependency of the firmware and referring to it by path. This lets the phoenix app get compiled when necessary but avoids complications introduced in the standard umbrella app strategy, the benefits of which are largely lost in a nerves deployment anyway. I'm going to call the app skeleton and refer to it as such throughout this post. If you give your app a different name be sure to change all references to skeleton to your new name, respecting the cases used. Execute the following commands to create the project. The phoenix app is created without brunch and without database support using the --no-brunch and --no-ecto flags. Nerves system volumes are read only, so installing a database is a complication not within the scope of this post. During the process you'll be prompted to install dependencies. It's fine to agree.
mkdir skeleton
cd skeleton
mix nerves.new fw
mix phx.new ui --no-ecto --no-brunch
Just like that our project has been created. Seems easy right? First we do a simple sanity check to make sure our phoenix app is working.
Running in host mode
Set your MIX_TARGET to host before starting your app to run in host mode. This lets you develop the UI of your Phoenix application within the relative luxury of a full system. The combination of MIX_TARGET and MIX_ENV should let you tailor your dependencies and configs whether you are running under Nerves, on MacOS, or on the RPi0W but under a full system like Raspian. Host mode is the default mode for nerves, so setting it here wasn't strictly necessary but is a good practice for the times when you are switching around.
export MIX_TARGET=host
mix phx.server
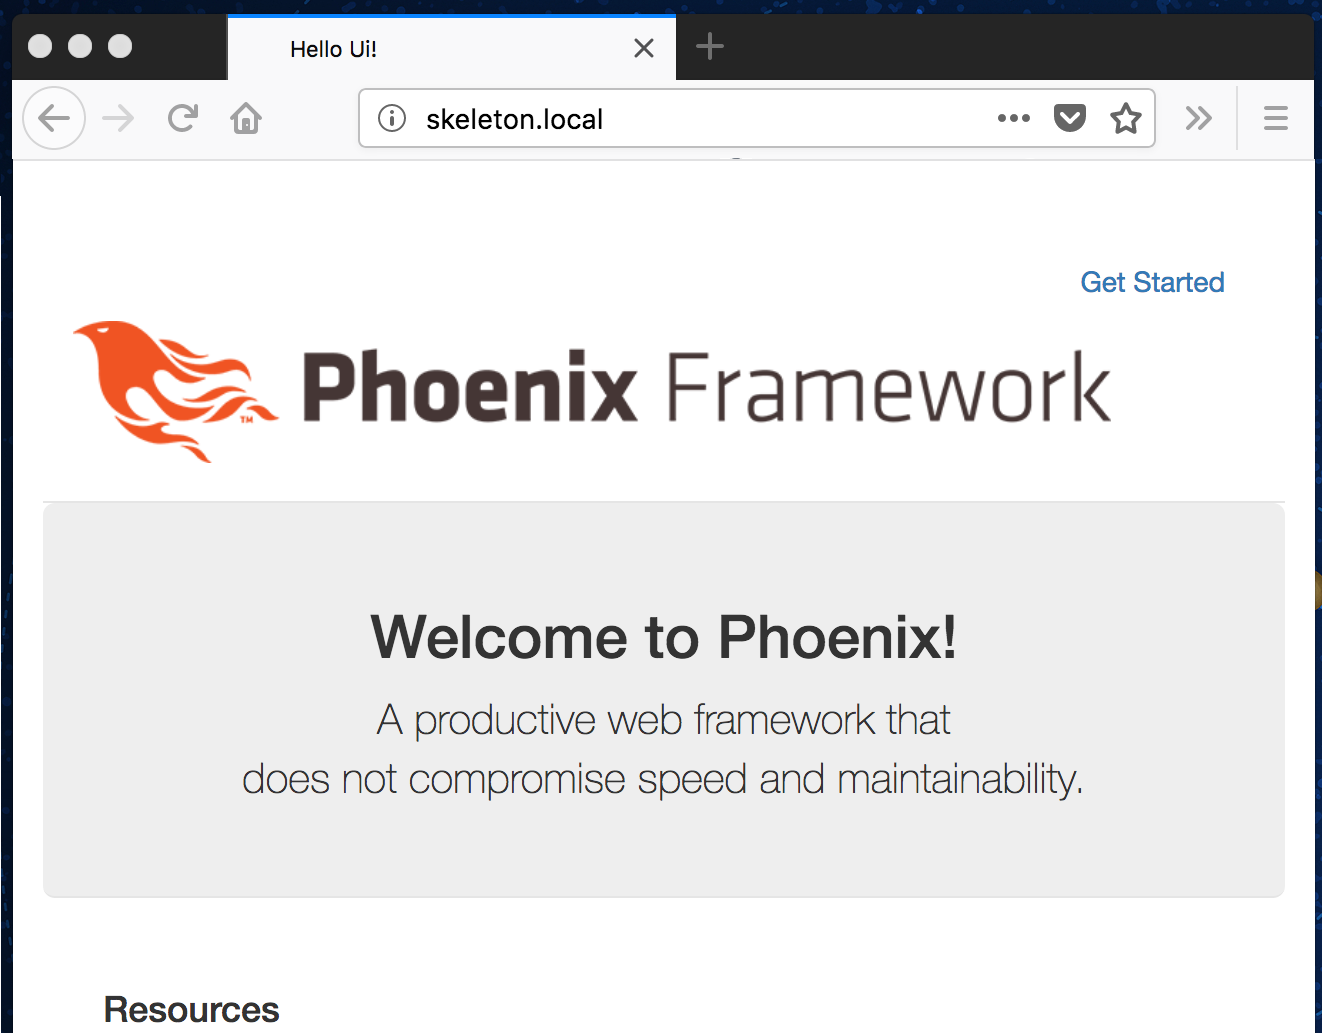
- Point your web browser to http://localhost:4000
- You should see the phoenix demo page.
- Success!

First firmware burn
Next order of business is to get our firmware written to an SD card and running on the RPi0W. To do this you will need your SD card mounted on your desktop either through an external SD card reader or laptop with an SD card reader built in. If all goes well this will be the only time we need to do the SD card shuffle, all rejoice in wireless firmware pushing! But first we need to make some changes to the default nerves project. Here we will add the dependency for our phoenix app and the handy nerves_init_gadget as well as update the configuration.
  def deps do
    [{:nerves, "~> 0.7", runtime: false},
     {:ui, path: "../ui"}] ++    # < < < add this
    deps(@target)
  end

  def deps(target) do
    [
      {:bootloader, "~> 0.1"},
      {:nerves_runtime, "~> 0.4"},
      {:nerves_init_gadget, "~> 0.2"}    # < < < add this
    ] ++ system(target)
  end
  init: [:nerves_runtime,
					:nerves_init_gadget]      # < < < add this

 # add all of the configurations below

config :nerves_firmware_ssh,
  authorized_keys: [
		 File.read!(Path.join(System.user_home!, ".ssh/id_rsa.pub"))
	 ]

config :nerves_init_gadget,
  ifname: "wlan0",
  address_method: :dhcp,
  mdns_domain: "skeleton.local",
  node_name: nil,
  node_host: :mdns_domain

config :nerves_network,
  regulatory_domain: "US"

key_mgmt = System.get_env("NERVES_NETWORK_KEY_MGMT") || "WPA-PSK"

config :nerves_network, :default,
  wlan0: [
    ssid: System.get_env("NERVES_NETWORK_SSID"),
    psk: System.get_env("NERVES_NETWORK_PSK"),
    key_mgmt: String.to_atom(key_mgmt)
  ],
  eth0: [
    ipv4_address_method: :dhcp
  ]

 # these settings are roughly copied from the prod.exs settings in your phoenix app. Any additional config your
 # app needs on the device must go in here also.
 config :ui, UiWeb.Endpoint,
  http: [port: 80],
  url: [host: "skeleton.local", port: 80],
  secret_key_base: "9w9MI64d1L8mjw+tzTmS3qgJTJqYNGJ1dNfn4S/Zm6BbKAmo2vAyVW7CgfI3CpII",
  root: Path.dirname(__DIR__),
  server: true,
  render_errors: [accepts: ~w(html json)],
  pubsub: [name: Ui.PubSub,
           adapter: Phoenix.PubSub.PG2]
Thats it! Now we can set the necessary environment variables and build our firmware. The final command requires the microSD card be inserted and mounted on the desktop. At the end of these commands your card will be formatted and overwritten with your new firmware! An extra nicety is that the card is unmounted afterwards, so you can just pull it out.
export MIX_TARGET=rpi0
export NERVES_NETWORK_SSID=the_network_name
export NERVES_NETWORK_PSK=the_network_password
mix deps.get
mix nerves.release.init             # only needs to be run the first time
mix firmware
mix firmware.burn
Take your newly burned SD card, place it into the RPi0W and reboot.
- Point your web browser to http://skeleton.local
- You should find the standard Phoenix welcome page again. But this time runnning on the RPi0W.
- Success again! But no celebrating, thats not good enough for us.
Network firmware push
Now we need to make sure the firmware push is set up correctly. It's hard to get across how great a thing this is. The SD card swap development cycle is not only time-consuming and inconvenient but also puts a lot of wear and tear on your patience and devices. So lets just say network firmware upgrading is a good thing, and best of all we should already have it set up. We just need to test this out, to do so we will make an edit to our home page, build the new firmware, push it over the network and reboot. Delete all of the text on the index page and replace it with this.
I've included 2 methods for building the firmware since there are many setups (like mine) where the first method (using mix) doesn't work. In method 2 we generate a script, edit that script and then run it. The edit is a simple one of replacing nerves.local with skeleton.local. This only needs to be done once. After that you can just invoke the script.
mix firmware

# try method 1
mix firmware.push skeleton.local
# if that doesn't work try this
mix firmware.gen.script
# edit the generated script
# replacing nerves.local with skeleton.local, then
./upload.sh
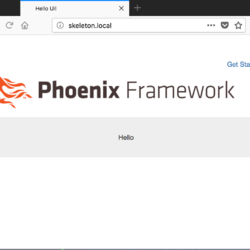
- Return to skeleton.local
- See the standard Phoenix layout with our new message.
- Huzzah!
For most projects your setup task is done. The standard nerves system provides most of the functionality a web device needs. In those cases there is no need to go further. You are rocking it at 10. But the title of this post indicates we are going to turn it up to 11, and so we are.
Adding a Python dependency
I will not debate the merits of including python in your Nerves apps, only point out that there is a lot of code out there in Python, code you do not want to rewrite in elixir, but it is a bit of a mixed bag. Let it just serve as a way to introduce an external dependency. Elixir and Nerves give you the ability to run external processes easily in a supervised, robust manner. But I'm not going to do that now. I will use it in the ugliest way possible to insure no one actually does this. But it will demonstrate the introduction of a missing dependency. Lets go back and edit our index page again. This time we will introduce a direct call on Python to execute a script and invoke NumPy, an extensive Python math libary, to output a simple matrix.
mix firmware
mix firmware.push skeleton.local          # or ./upload.sh
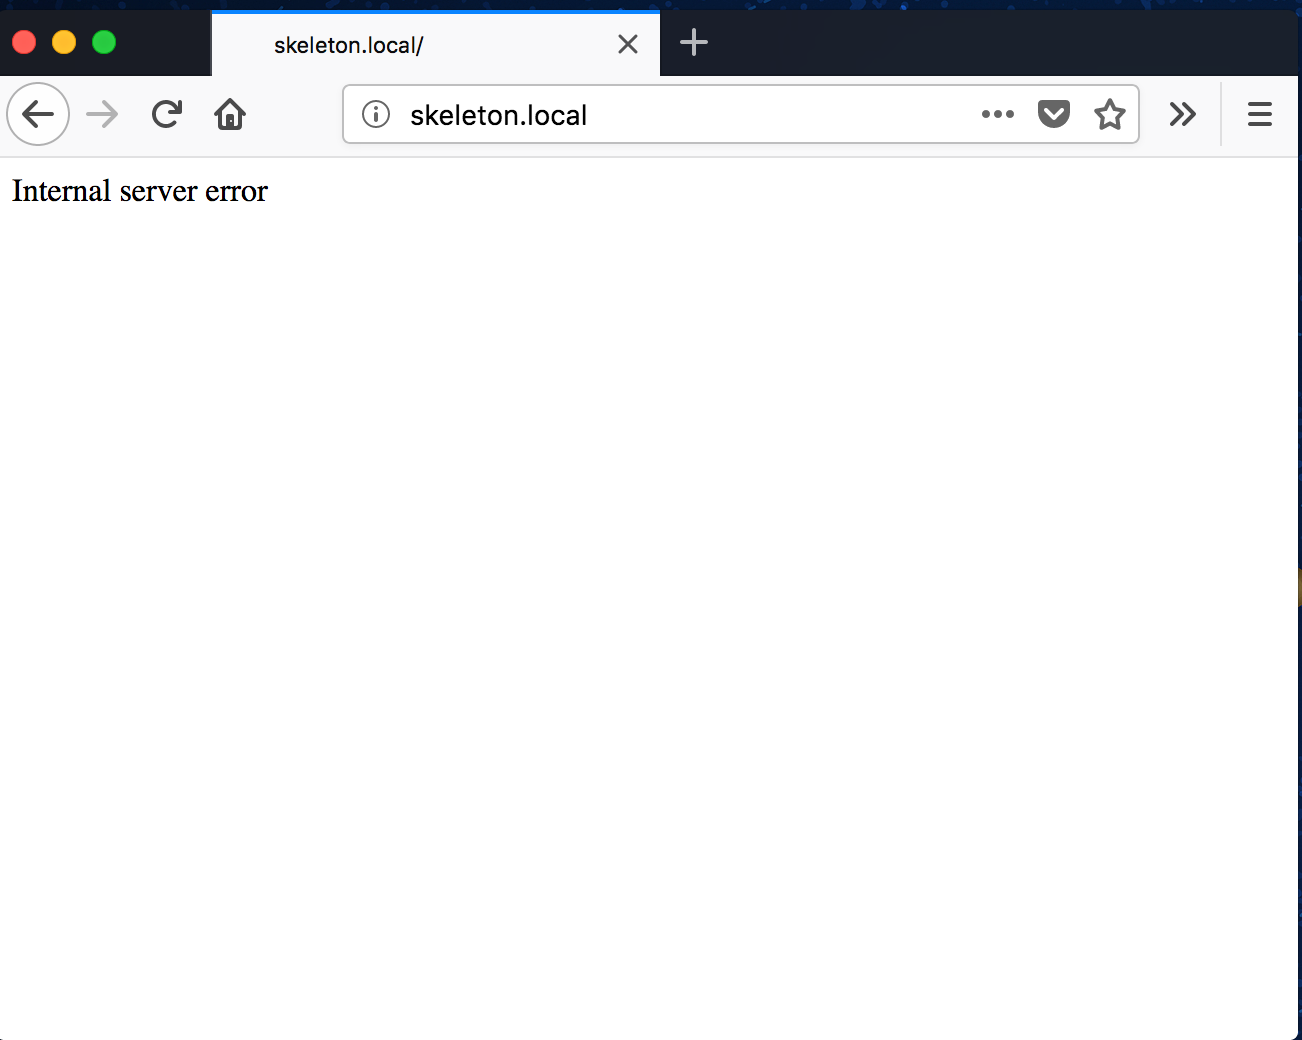
- try out the new page at skeleton.local.
- You should get this error page
- Ouch sadness
If you run the phoenix app in host mode you may see the correct output (depending on your computer's Python and NumPy setup). But the stripped down linux system Nerves provided us with has neither. If you are monitoring things using gadget mode you will see a lot of errors about not finding Python. We will now leverage the power of Buildroot in order to clear that up. You can follow along with the instructions in the hex docs in case anything goes wrong. The hex docs are a great source of general knowledge in either case.
Creating a Custom System
From the root of your project folder clone your current nerves system alongside your fw and ui folders. Then we'll rename the new system and tell our firmware how to find it.
git clone https://github.com/nerves-project/nerves_system_rpi0.git skeleton_system
defmodule SkeletonSystem.Mixfile do # < < <  Change the namespace
  use Mix.Project

  @version Path.join(__DIR__, "VERSION")
    |> File.read!
    |> String.trim

  def project do
    [
      app: :skeleton_system,     # < < <  Change the app name
      version: @version,
      elixir: "~> 1.4",
      compilers: Mix.compilers() ++ [:nerves_package],
      nerves_package: nerves_package(),
      description: description(),
      package: package(),
      deps: deps(),
      aliases: ["deps.precompile": ["nerves.env", "deps.precompile"]]
    ]
  end
 # and comment out the artifact url
  def nerves_package do
    [
      type: :system,
#      artifact_url: [
#        "https://github.com/nerves-project/#{@app}/releases/download/v#{@version}/#{@app}-v#{@version}.tar.gz"
#      ],
      platform: Nerves.System.BR,
      platform_config: [
        defconfig: "nerves_defconfig"
      ],
      checksum: package_files()
    ]
  end
  def system("rpi0"), do: [{:nerves_system_rpi0, ">= 0.0.0", runtime: false}]
	#  v v v insert this line pointing to the new system
  def system("skeleton_system"), do: [{:skeleton_system, path: "../skeleton_system", runtime: false}]
  def system("rpi2"), do: [{:nerves_system_rpi2, ">= 0.0.0", runtime: false}]
Now that is all set up its time to enter the world of Buildroot and get our custom system built.
export MIX_TARGET=skeleton_system
mix deps.get
mix nerves.system.shell

# then at the nerves_shell prompt
make menuconfig
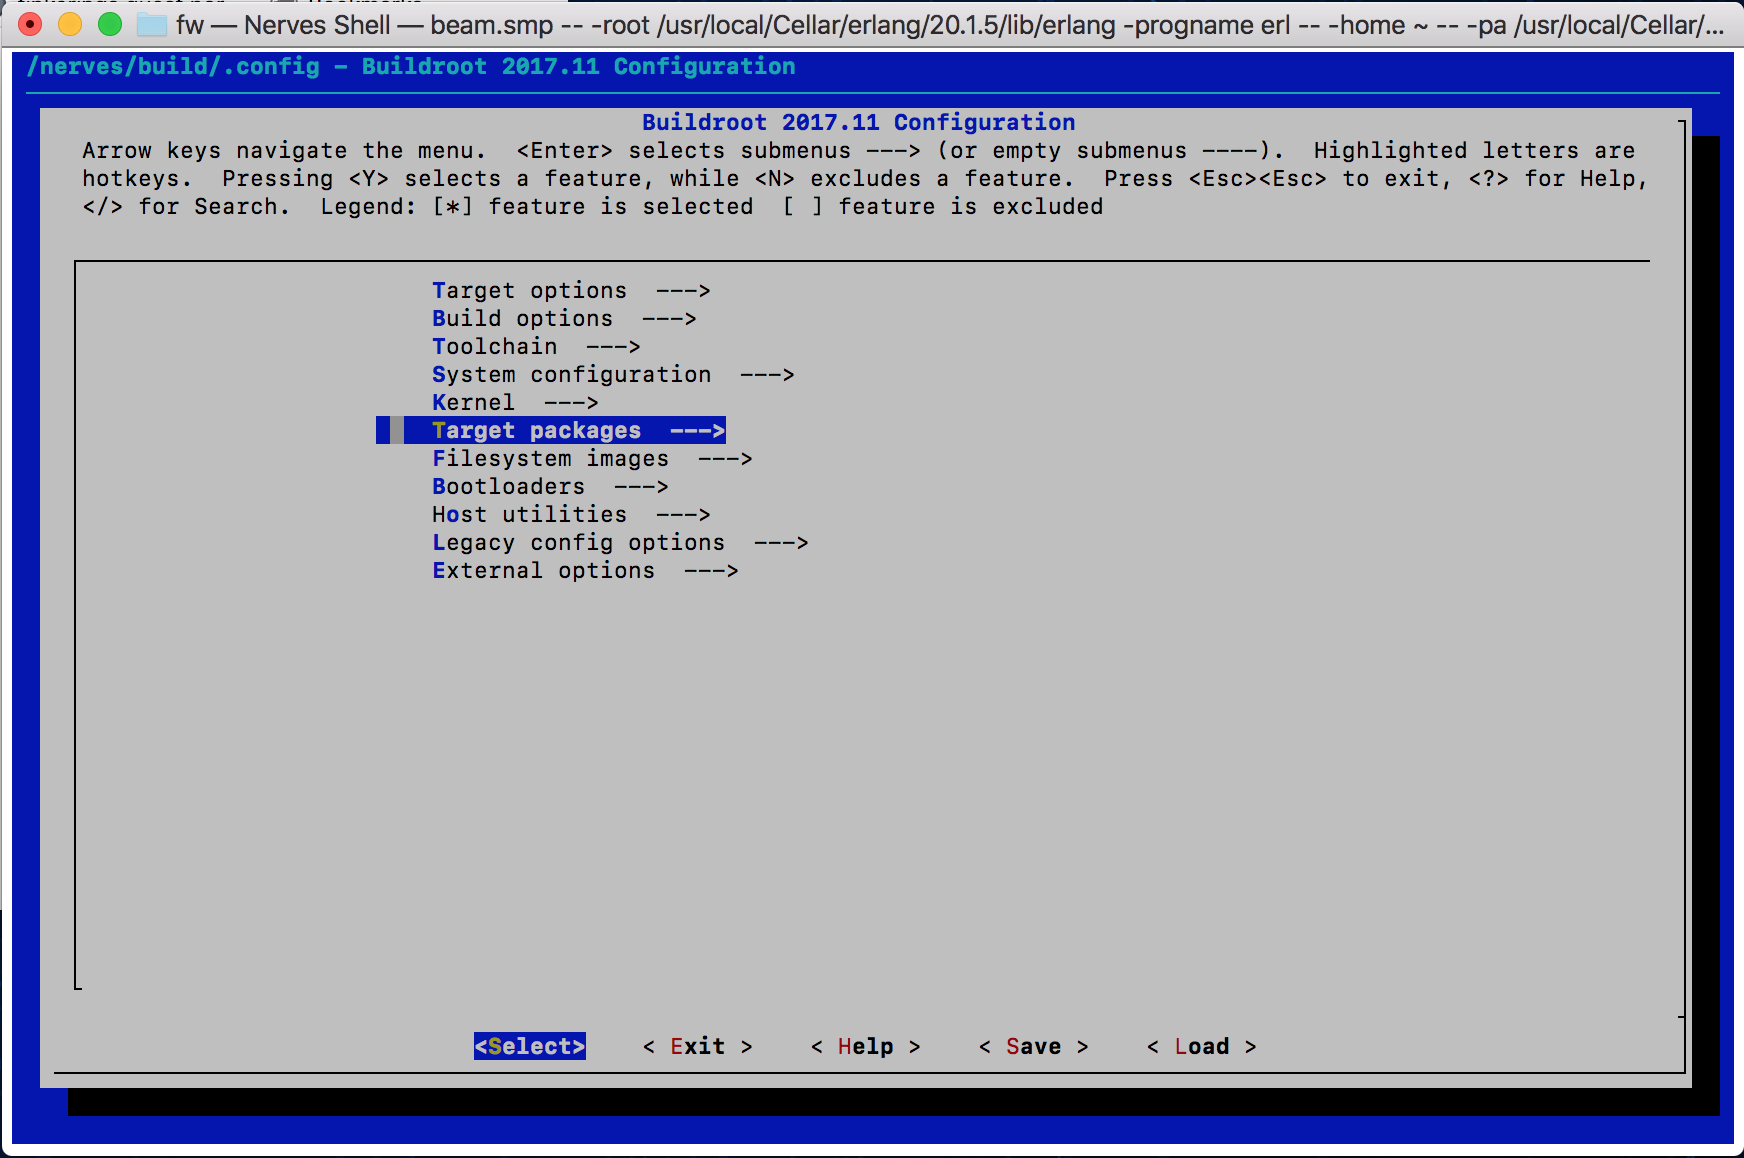
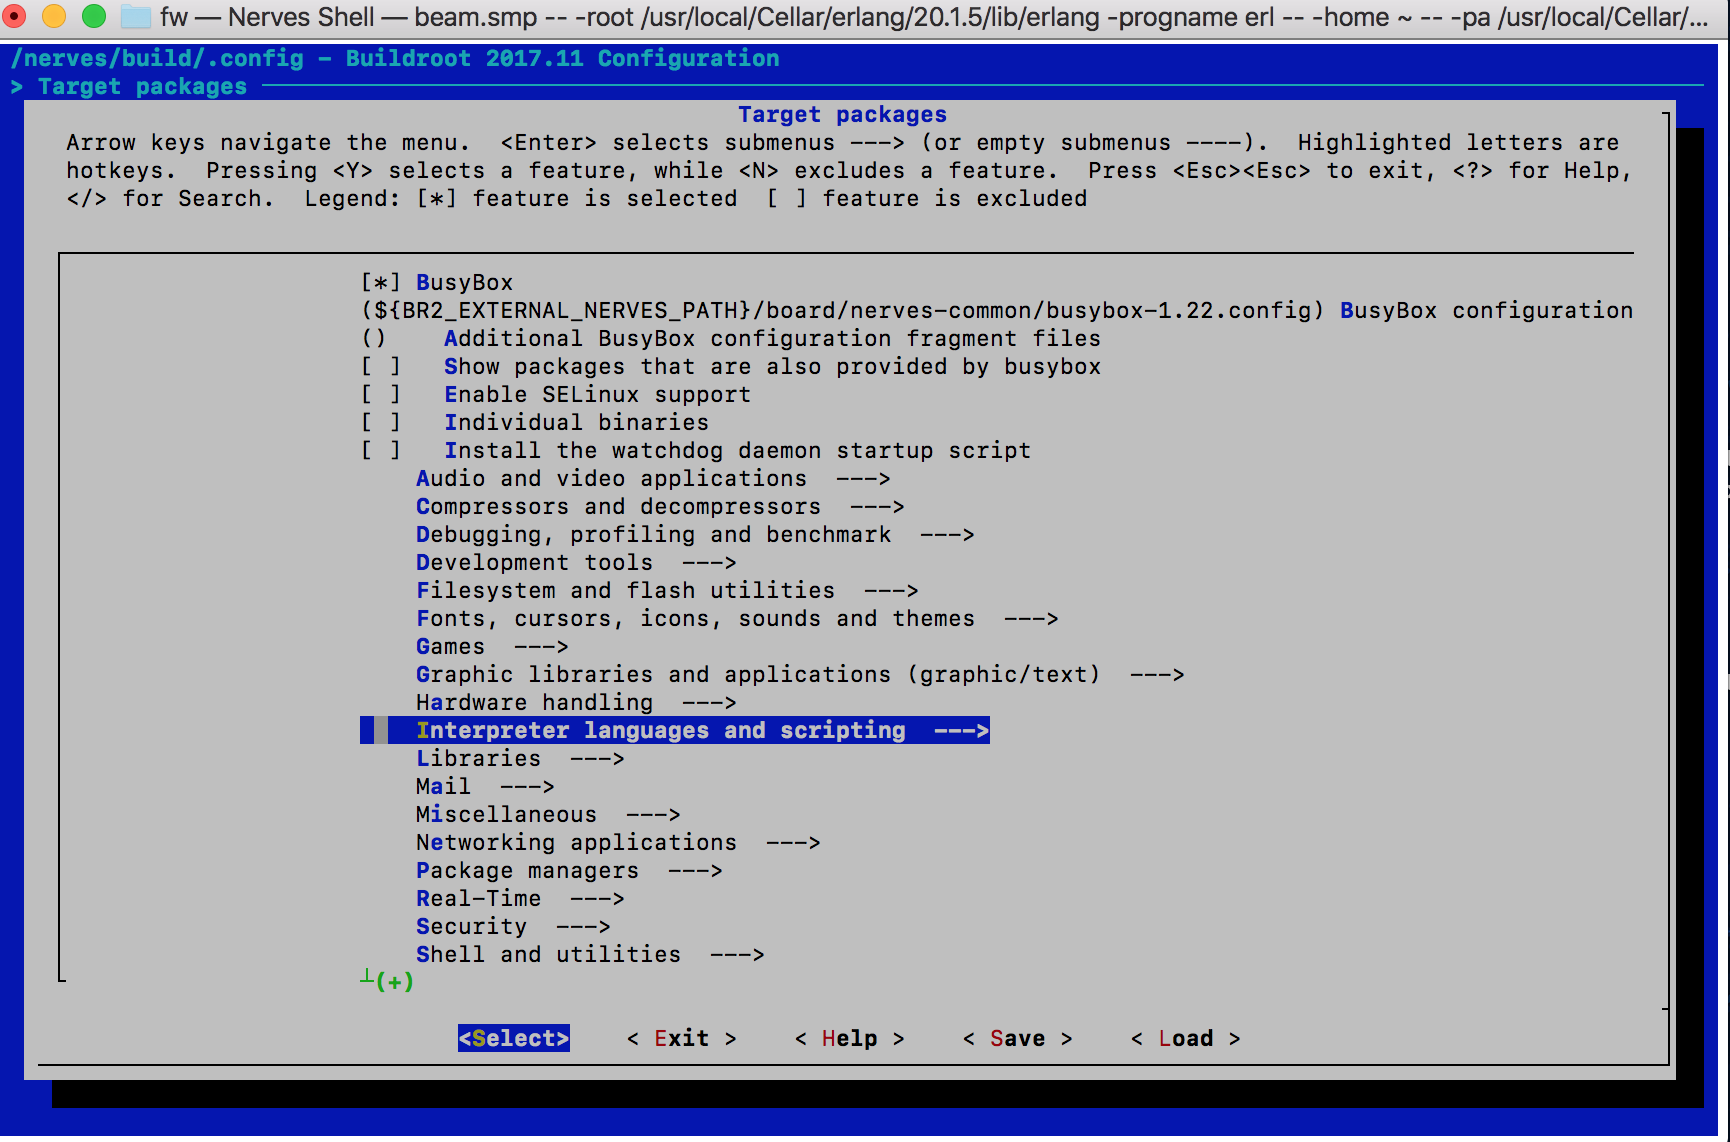
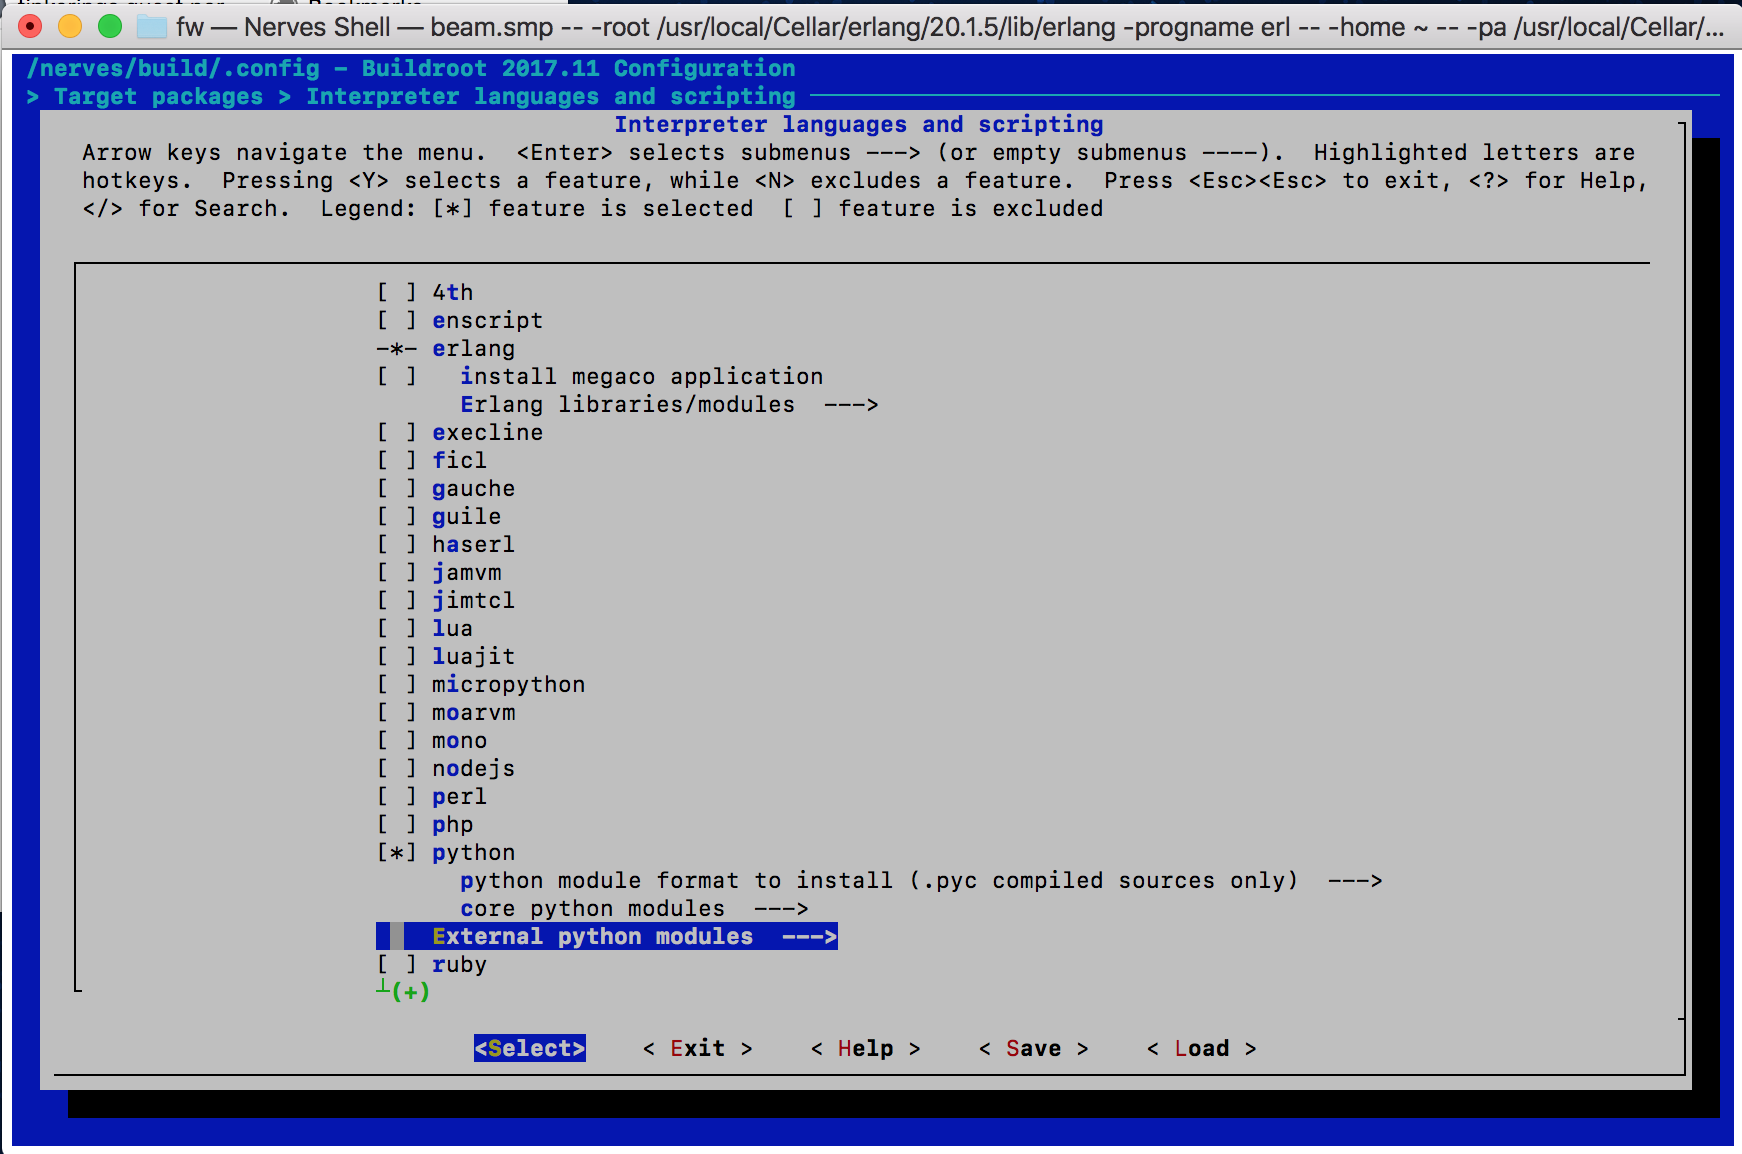
After the build you should enter into the buildroot menuconfig screen as shown below. Use your arrow keys to navigate the choices and the Y key to add an item to your build. Similarly use the N key to remove a checked item from your build. In this case we need to navigate to the "Target Packages/Interpreters/ and turn on Python. Then continue navigating down the Python external module until you see python-numpy, also select that. These options are shown below:
Now you can select the exit command to climb out of the buildroot hierarchy, ultimately saving your changes before you exit back to your nerves_shell. Then enter ```make savedefconfig``` to save the new config where your nerves build scripts will find it. Now it's ok to exit the nerves shell and enter the following:
mix firmware
mix firmware.push skeleton.local          # or ./upload.sh
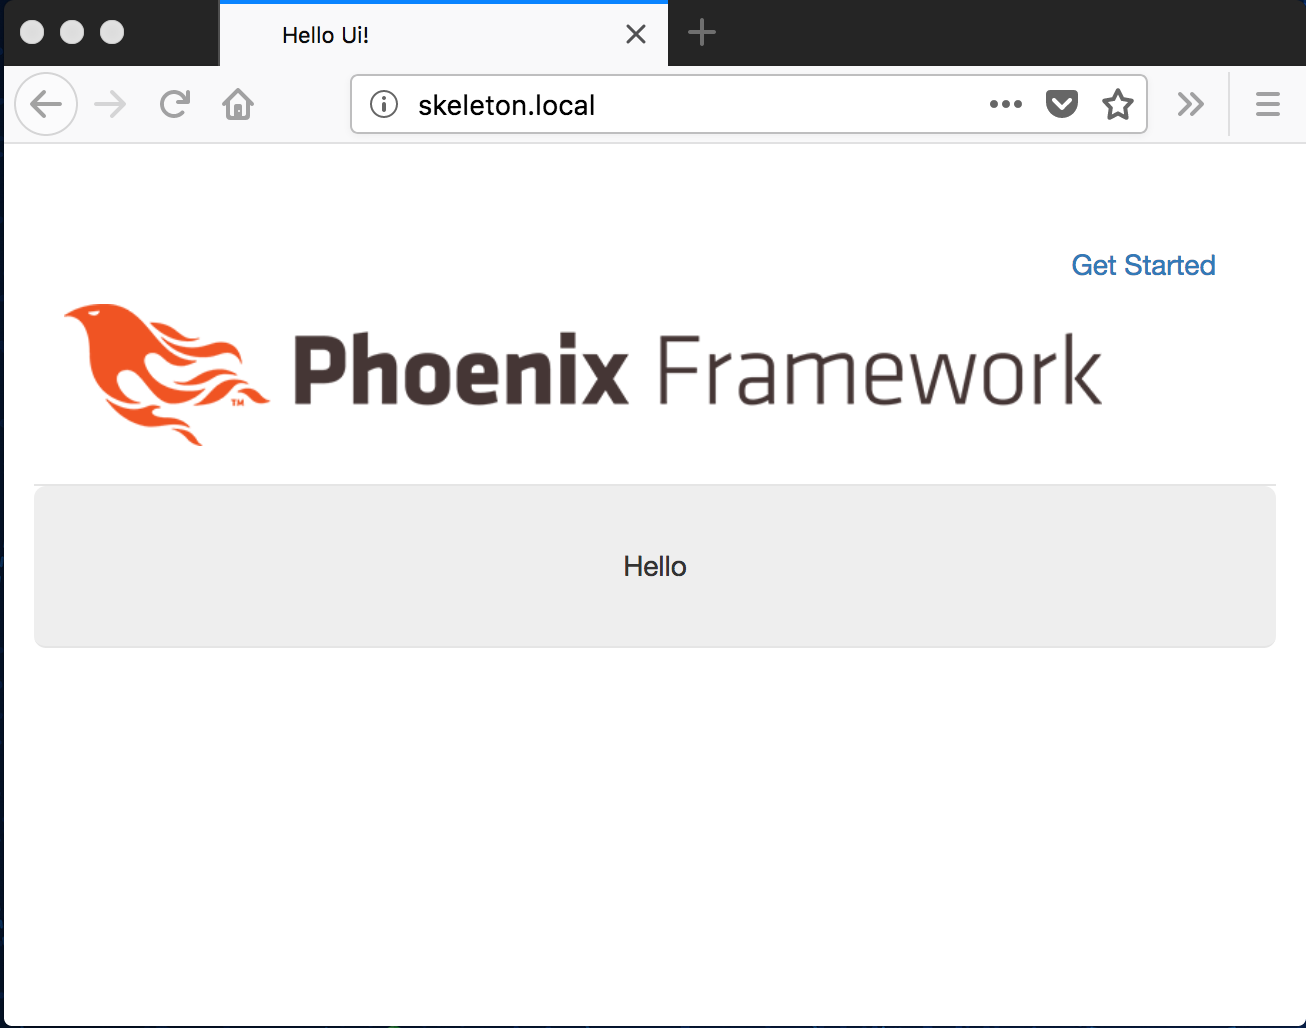
- Now point your web browser to skeleton.local
- You should find the standard Phoenix layout, but with our matrix data from numpy nicely illustrated.
- True Success! Your defeat of the tiny processor is full and complete.
Just like that the job and this post are done. We have a phoenix app deployed on an RPi0W, with push firmware updating a customized system. It is a pleasant and efficient development stack point for any kind of IOT device interactions. Add amazing functionality and enjoy!
Related Links


