Domain Holding is the act of using the internet's Domain Name System (DNS hereafter) as a to do list of potential million dollar ideas. It is a perfectly valid activity, not to be confused with for-proft domain squatting which isn't.
The fault with this method of organization is that it's too easy get stalled on the step between acquiring the perfect domain name and doing something with it. I wanted to make this as easy as filling out a form as well as have a single place to check all my domains. This way they can all mock my procrastination at once.
Luckily the power inherent in Elixir and Phoenix makes the web side of this straightforward. However there are a number of additional hoops that need to be jumped through in order to host these domains from inside your home network, which I will detail in this blog post.
For extra bonus points I will run this app on an Raspberry Pi 0W using Nerves as well as explain why doing so is probably a bad idea. If nothing more it's a useful demonstration of the steps needed to make any Nerves device available to the general internet. All of the source code to this project is posted in this github repository for reference. You can clone that repository and follow along if you wish.
But first the snappy demo:
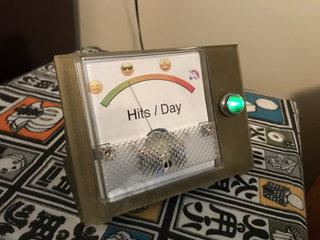
Note the Phoenix LiveView index page at http://domainholder.local updating the page counts live as the browser accesses http://www.sampledontgohere.com and http://stevesbigblog.com. The blinking light indicates an incoming web request and the meter displays the extrapolated hits per day.
Handling a dynamic IP address
The first obstacle we'll face in this process is (probably) your home's dynamic IP address. The IP address is a number which your home router uses to connect to the the internet. The DNS uses the IP address to associate domain names to the computers that host them. Unfortunately most home internet connections have dynamic IP addresses, which means your home's IP address will change from time to time. Due to the strange ways the DNS propagates information changing the IP address of a domain can take days to fully resolve and in general is something to be avoided. It isn't feasible to change your DNS registration every time your IP address changes. To get around this we will use whats known as a Dynamic DNS Service to establish our presence on the web. These services maintain a stable IP address to use for your website's DNS entry, but will redirect incoming packets to whichever IP address you home connection currently has. There are many DDNS services, in this example I will use dynu.com. Their interface is easy to use, they have a free offering that is well within my needs, and best of all they provide an API we can use to automatically keep our Nerves device visible on the internet (even when the home IP address changes). Once you have created your Dynu account you can proceed through the following steps on Dynu:


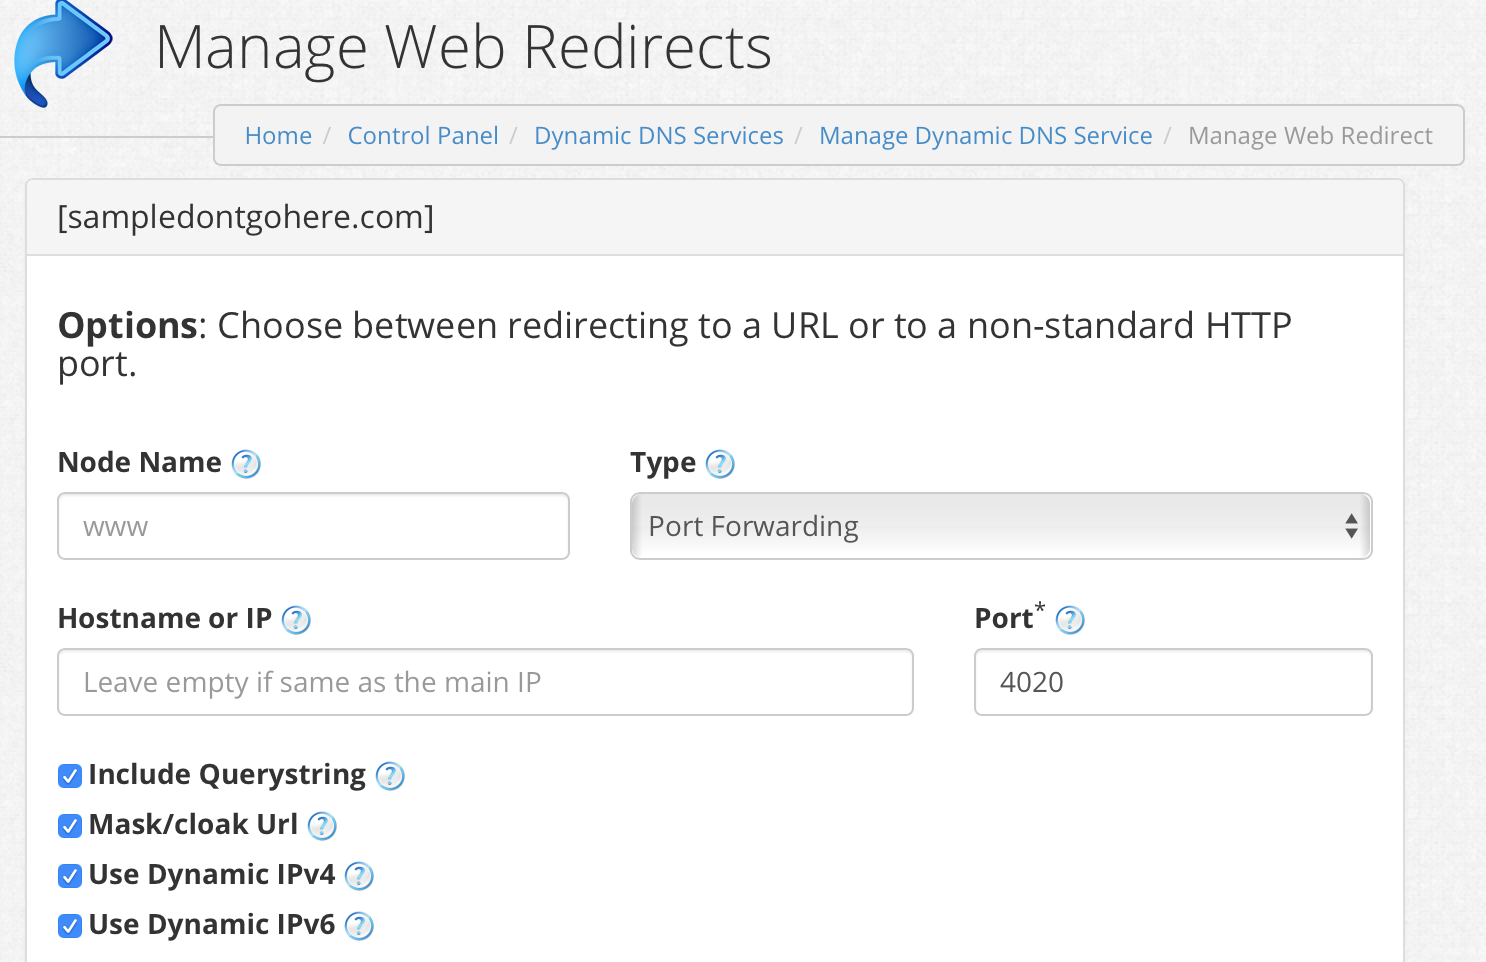
Note in the settings I am redirecting to port 4020. This can be any value but it needs to be a port that isn't already open on your home router. If you don't know what that means, use 4020 for now and read on. Once this is set up I can use the DynuReporter package to make check in periodically and alert Dynu to our IP address in case it's changed.
config :dynu_reporter,
  password: "UPDATE_PASSWORD",
  location: "RPI0W",
  user_name: "YOUR_USER_NAME",
  polling_interval: 1000 * 60 * 30
Getting through the router
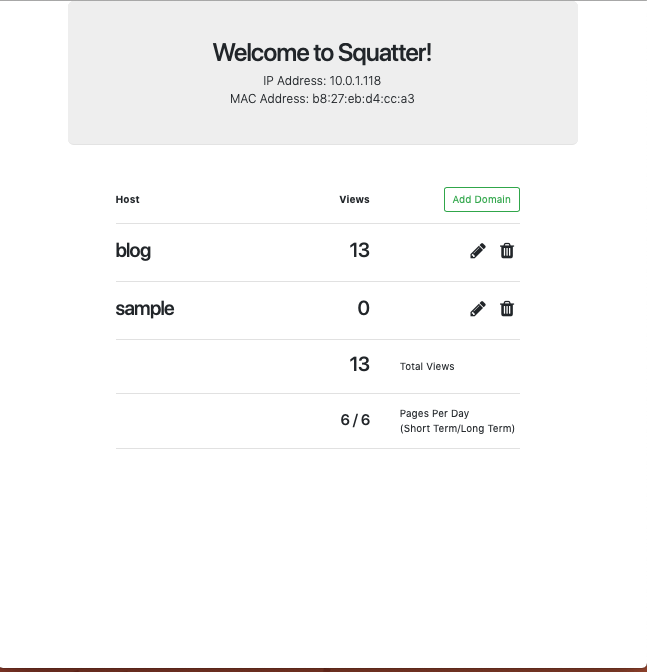
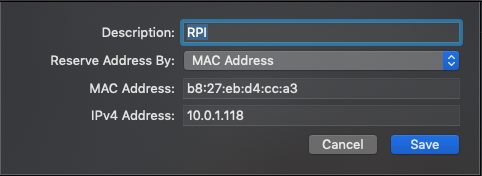
The second obstacle we face will be routing inside the internal home network. Your router and it's IP address occupy just one slot in the general internet. Any devices inside your network have their own internal IP address that the router gives them. The router keeps track of the mappings and makes sure each packet gets to the device that it should through Network Address Translation or NAT. Usually this happens automatically, but in our case we will want to specify the internal address we're given. To do this you will need the current IP address and MAC address of your device. Luckily this is provided on the front page of the DomainHolder app as shown below. The Dynu service redirect handles getting web requests to our home home router, but we will need to instruct the router how to handle these connections. This is where the port setting we gave to Dynu comes into play. In the example it was set to 4020, so I will carry through with that value here. Specifically we'll need to have the router send all connections to port 4020 to the internal IP address our device is at. I've illustrated the steps below:

Multiple domains served by Phoenix
So with that routing in place the external request will arrive at the RPI0W where Elixir and Phoenix take over. Thanks to the Plug based design of Phoenix's Cowboy web server the functionality can be handled in a single module. When using Phoenix and Cowboy every web request is routed through a list of modules that implement the Plug behavior. In turn each plug can examine the data attached to that web request and possibly modify it, pass it on to the next plug, or terminate the request. So the domain handling code consists of a single plug that looks at the host name attached to the incoming request and decides whether to display a custom landing page, a catch-all default landing page, or in the event of a request to DomainHolder specifically it will pass it down the chain to display the domain editing pages.
  # This function will be called to handle a web request, and must be present.
  def call(conn, _opts) do
    con =
      # Check our persistance layer to see if the requested domain is a known one
      case Domains.get_domain_by_host(conn) do
        nil ->
          # It isn't a known host, check to see if it's a request for the web app.
          if is_local_access?(conn.host) do
            Conn.assign(conn, :domains, Domains.list_domains())
          else
            Domains.increment_counter()

            %Domain{host: conn.host, tagline: "you never know what you're getting"}
            |> render_domain(conn)
          end

        # In this case the domain was found, put up it's landing page
        domain ->
          case conn.path_info do
            [] ->
              {:ok, domain} = Domains.increment_counter(domain)
              render_domain(domain, conn)

            _any_other ->
              conn
          end
      end

    con
  end

  # In any case where we render a landing page we terminate the request at that point
  defp render_domain(domain, conn) do
    body = View.render_to_string(DomainHolderWeb.PageView, "show.html", conn: conn, domain: domain)

    conn
    |> Conn.update_resp_header(
      "content-type",
      "text/html; charset=utf-8",
      &(&1 <> "; charset=utf-8")
    )
    |> Conn.delete_resp_header("x-frame-options")
    |> Conn.send_resp(200, body)
    |> Conn.halt()
  end
In order to see this in action on your host machine go to the domain_holder folder and start the Phoenix server.
cd domain_holder
mix phx.server
You'll find the standard DomainHolder index page at http://localhost:4000. It should also have a default entry for 127.0.0.1, which is an alternate notation for your local machine. You can edit the default landing page and upon visiting http://127.0.0.1:4000 you should be able to see it.

Deploying with Nerves
Finally it's time for the deployment on the RPI0W using Nerves. This project has no special needs, so it can be run under the stock Nerves system. Since I'm using a Raspberry Pi Zero W I will set up for that system using the commands below. Any different hardware target should use the appropriate Nerves system.
export MIX_ENV=prod
export NERVES_NETWORK_SSID=YOUR_WIFI_NETWORK_NAME
export NERVES_NETWORK_PSK=YOUR_WIFI_NETWORK_PASSWORD
export DYNU_UPDATE_USERNAME=YOUR_DYNU_NAME
export DYNU_UPDATE_PW=YOUR_DYNU_PASSWORD

export MIX_TARGET=rpi0
# export=rpi3  for rpi3, etc

mix firmware
mix firmware.burn
If that all goes according to plan you should have your DomainHolder firmware burned on the SD card and ready to use to boot your Nerves device. Hopefully it won't be too long before the device appears on your wifi network at http://domainholder.local. Finally the project gets its fancy casing in the first implementatation of BlinkOMeter, an Open Source project shell for anything that can express its output using a meter and a light. Stay tuned for an upcoming post detailing how to use it in your own projects.


In summation
And there you have it. My possibly ill advised DomainHolder app is up, running and serving parking pages for all the world to see. I'm not sure of how long I'll keep these domains hosted here. In general domain hosting is probably best done behind a dedicated IP address at a data center. You wouldn't want your billion dollar project to be subject to home internet disconnects, wifi congestion, or random unplugging incidents, would you? In addition I suppose there are some risks inherent any time you open up a port on your router, especially for a public facing application. But it's been an interesting project and a good primer for providing domain name accessibility to your own Nerves devices. Thanks for reading!
Related Links


