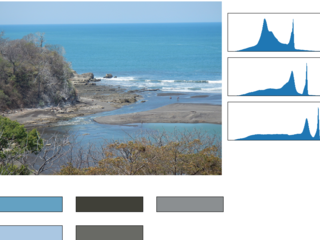
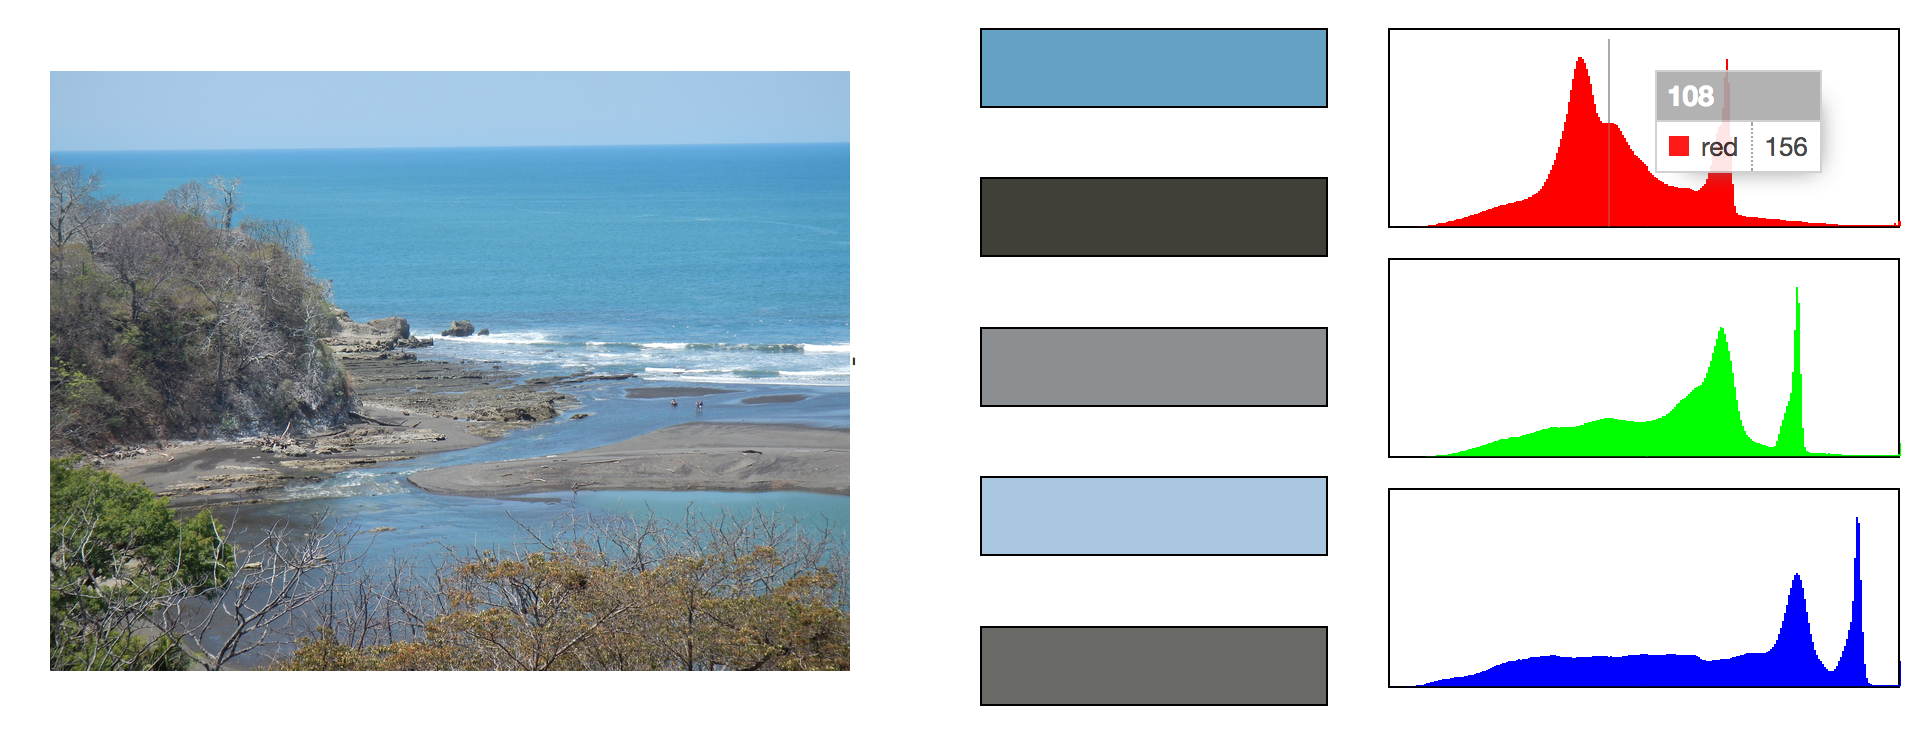
In my previous blog post I discussed using using Elixir's Flow module to process photos for uptake into a database. But in that post the operations performed were all pretty simple. In this post I'll extend my elixir image analysis abilities with the C++ based OpenCV library, and the ocv_photo_analyzer wrapper package source code on Github | hex. The ocv_photo_analyzer lets me generate histograms and find the dominant colors inside images through elixirs Port module. Shown below is the display of a simple sample app (available in this github repository ).
Harnessing C code from elixir
There are plenty of ways to use your own C code in Elixir, in this case the simplest and safest way turned out to be the best. I did orginally try starting a single instance of OpenCV code and sending messages back and forth, but the length of time the analyses took was a huge bottleneck and left me unable to process images concurrently. I found it better to boot an instance, process one request and then end the instance, this puts the threading control into the calling applications hands, if needed allowing letting several processes analyze images at once. It didn't have a large effect in the example app but was a big improvement for the PhotoFlow implementation.
So I turned to the Porcelain gem to help me get that rolling which made things very easy. I just convert the parameters to a set of flags and Porcelain handles booting up the C instance and sending it the flags. It then retrieves the result for us, and hopefully all thats left to do is strip off the length byte from the front of the results, and then let :erlang.binary_to_term converts that into a convenient Elixir Map for us.
  def analyze_file(file_path, opts) do
    proc_params = convert_params(opts) ++ [file_path]

    case Porcelain.exec(executable_path(), proc_params, out: :iodata, async_in: true) do
      %Result{err: nil, out: [_, data], status: 0} ->
        data |> strip_length_int |> :erlang.binary_to_term

      %Result{err: err, status: status} ->
        Logger.error "received exec error #{err} status: #{status}"
        %{err: :exec_error}

      _ ->
        %{err: :unknown}
    end
  end

  defp strip_length_int(<<_lng::size(16), data::binary>>) do
    data
  end
Sending the results from C operations back in an elixir friendly map is the tricky part, luckily it's made a lot easier thanks to the erlang ei module. Though a little byzantine it still makes a nice API to shield you from needing to know anything about the erlang binary term format. The C code below takes the image path and computes the histogram data, and then stores it in the map format we need.
main {
  char resp[2048];
  int resp_index = sizeof(uint16_t);

  ei_encode_version(resp, &resp_index);
  ei_encode_map_header(resp, &resp_index, cnt);
	make_histogram(src, resp, &resp_index);
	// other code....
  erlcmd_send(resp, resp_index);
end

void make_histogram(Mat src, char* resp, int* respIndex) {
  vector bgr_planes;
  split(src, bgr_planes);

  int histSize = 256;

  float range[] = { 0, 256 } ;
  const float* histRange = { range };

  bool uniform = true; bool accumulate = false;

  Mat b_hist, g_hist, r_hist;

  calcHist( &bgr_planes[0], 1, 0, Mat(), b_hist, 1, &histSize, &histRange, uniform, accumulate );
  calcHist( &bgr_planes[1], 1, 0, Mat(), g_hist, 1, &histSize, &histRange, uniform, accumulate );
  calcHist( &bgr_planes[2], 1, 0, Mat(), r_hist, 1, &histSize, &histRange, uniform, accumulate );

  normalize(b_hist, b_hist, 0, 256, NORM_MINMAX, -1, Mat() );
  normalize(g_hist, g_hist, 0, 256, NORM_MINMAX, -1, Mat() );
  normalize(r_hist, r_hist, 0, 256, NORM_MINMAX, -1, Mat() );

  long hldr_r[256];
  long hldr_g[256];
  long hldr_b[256];

  for( int i = 0; i < histSize; i++ ) {
    hldr_r[i] = (long)cvRound(r_hist.at(i));
    hldr_g[i] = (long)cvRound(g_hist.at(i));
    hldr_b[i] = (long)cvRound(b_hist.at(i));
  }

  send_histogram(resp, respIndex, hldr_r, hldr_g, hldr_b);
}

void send_histogram(char* resp, int* resp_index, long* reds, long* greens, long* blues) {
    ei_encode_atom(resp, resp_index, "histogram");

    ei_encode_map_header(resp, resp_index, 3);        # creating a map with three keys
    ei_encode_atom(resp, resp_index, "r");                  # encode an atom for key 1

    ei_encode_list_header(resp, resp_index, 256);       # encode an list of 256 elements for value 1
    for( int i = 0; i < 256; i++ )
      ei_encode_long(resp, resp_index, reds[i]);            # encode each element as an long
    ei_encode_empty_list(resp, resp_index);                # this closes out the list

    ei_encode_atom(resp, resp_index, "g");                 # repeat for green and blue channels
    ei_encode_list_header(resp, resp_index, 256);
    for( int i = 0; i < 256; i++ )
      ei_encode_long(resp, resp_index, greens[i]);
    ei_encode_empty_list(resp, resp_index);

    ei_encode_atom(resp, resp_index, "b");
    ei_encode_list_header(resp, resp_index, 256);
    for( int i = 0; i < 256; i++ )
      ei_encode_long(resp, resp_index, blues[i]);
    ei_encode_empty_list(resp, resp_index);
}
Processing images in the example app
Since I wanted the pages to load quickly, and then get notified when the analyses were done I decided to create AnalyzeChannel to utilize the Phoenix Channels functionality. When the page is loaded a connection is made to the AnalyzeChannel. In the code below the channel listens for the client to send a ``start_load`` message back to the channel. Upon receiving that it first performs the histogram analysis, broadcasts the results, then performs the color clustering and broadcasts the results of that. The web page loads quickly and is still responsive thanks to Elixirs concurrency model. A snippet of the interesting code is shown below while the full code to handle the broadcasting is available in the github repository.
  def handle_in("start_load", payload, socket) do
    OcvPhotoAnalyzerExample.Photos.create_histogram(payload)
    |> broadcast_histogram(socket)

    OcvPhotoAnalyzerExample.Photos.find_dominant(payload)[:dominant]
    |> broadcast_dominant_color(socket)

    {:noreply, socket}
  end

  defp broadcast_histogram(hst, socket) do
    broadcast!(socket, "refresh", histogram_format(hst))
  end

  defp histogram_format(hst) do
    %{
      histogram: hst.histogram
    }
  end
function start_connection() {
  channel = socket.channel("photo_analyzer:live", {})
  channel.join()
    .receive("ok", resp => {
      react_to_payload(resp)
      if ( file_full_path != "")
        channel.push("start_load", file_full_path)})
    .receive("error", resp => { console.log("Unable to connect", resp) })

  channel.on("refresh", payload => {
    react_to_payload(payload)
  });
}
When the data is received back by the client I use the wonderful C3.js package to draw the histograms and some simple jQuery to draw the dominant colors.
Processing images inside PhotoFlow
Incorporating photo analysis into a Flow pipeline was even more straightforward. After creating a Photos.Analysis model to store the data all that was needed was an Flows.Analyzer module to do the computation. The relevant code is fully shown in this commit.
defmodule PhotoFlowExample.Flows.Analyzer do

  alias PhotoFlowExample.Flows.FlowPhoto
  alias PhotoFlowExample.Photos

  def execute(%FlowPhoto{original_path: path, photo: photo} = item) do
    an_data = OcvPhotoAnalyzer.analyze(path)
    {:ok, anal} = Photos.create_analysis(%{
      photo_id: photo.id,
      histogram: an_data.histogram,
      color_one: Enum.at(an_data.dominant, 0),
      color_two: Enum.at(an_data.dominant, 1),
      color_three: Enum.at(an_data.dominant, 2)
    })
    FlowPhoto.add_analysis(item, anal)
  end
end
The additional image processing actually added little time to the overall run time of the flow as the rate limited processes were still the deciding factor.
Pitfalls and improvements
One issue not really addressed in the example app is the processing deadlock you can get into if you start looking at lots of pages without waiting for the color clustering to complete. As it's written in the sample app. There these processes will not die when you leave the page, and will send their information back through the channel whenever they do complete. This could easily result in data arriving out of order, and any given page then displaying the wrong info. Although this could be worked out, if the workflow shown in the example app is really how you wanted to do things, but I didn't bother with that here. This code and plugin seem much more at home in a Flow situation, where they will always be allowed to run their course. In the future I will be looking at more ways OpenCV can be leveraged in the name of photo analysis, as well actually wrapping this all up into the Nerves project it has always been meant to be a part of!


